We have seen in details themontage them programming language. The training themes shown you all the possibilities offered by this wonderful tool that are montage theme, now decrypted ! But knowing the alphabet does not mean being able to write novels. We will see in this tutorial how to program a montage theme step by step without using any template !
A visitor asked me to help him creating a theme that would produce a transition consisting in moving the full screen to one of its corner, while reducing its size down to 0. 4 successive windows will be used for each of the 4 corners.
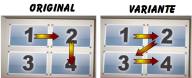
This idea will be used as topic for this tutorial. The montage theme will consist in 5 videos located one behind the other. As described above, these transitions will consist in dragging the current windows into one corner, while reducing its size until it disappears. A short video worth a thousand words, here is what we're going to build ...
How to do that ?
The anxiety of the blank page is the biggest obstacle to the realization of a montage theme. To achieve this theme, we must first consider the needed objects and their arrangement to each other.
We have a first clip which is the opening sequence, and which will disappear in the top left corner
a second clip that will disappear through the top right corner
a third clip which disappear in the bottom right corner
A fourth clip that will disappear through the bottom left corner,
and finally a fifth clip that will be the output sequence of the theme.
So we have to manage 5 clips in this theme, mapped on 5 drop zones. It will thus be 5 objects ImageExplicit , one for each clip. To make our theme nicer, I suggest to use Wipe objects. They will allow to create a border around each window moving to one of the 4 corners. Of course, associated with each of these Wipe, we will need a Material.
We have now to consider motion objects to manage the animations. To do this, I use Keyframer objects for each layout object (except for the the last one which will remain fixed to produce the ending of the theme) The most important now is to define the animation chronology. This step is especially important to avoid having to modify a large number of objects, which is a source of lost time. We have 5 clips, each one will be seen during 4 seconds. Every transition will last 0.8 seconds (I chose this value for the transition to be fast enough, but you are free to choose any other value ... it will undoubtedly be a profitable exercise ).
The first transition will therefore start at 3.2 seconds to finish in 4 seconds.
The second will start at 7.2 seconds to 8 seconds.
The third starts at 11.2 seconds to 12 seconds.
last start at 15.2 seconds, until to 16 seconds.
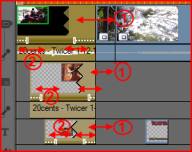
We let another 4 seconds to display the ending clip before ending the theme, bringing the total duration to 20 seconds. Without special precautions, each video will start from the beginning of the theme. Since only the first clip is originally visible, the others being hidden, it will be very difficult to manage the starting point of each video .... In addition, as several clips will be played at the same time, all sound track will be audible, making the whole incomprehensible! We'll specify for each clip a period of freezing before and after their effective display period on screen. Another method would be to define a lifetime for each object using the parameters Start and End in the imgObjectTime tag of each object.
The figure below summarizes the chronology of the theme.
Create the montage theme structure.
First, you will have to create a directory that contains your theme. If you have already created a theme in a previous project, you can place this new theme in the same directory, it will be then displayed in the same series as your other montage theme.
See here how to create a directory. To create the header of your theme, the easiest is to copy/paste the header of an existing theme, and then to make the needed modifications. Here below is an header example : <?xml version="1.0" encoding="UTF-16"?> <imgDocument Name="?{PinnacleContent}IMG-Templates\directory\file.ixl" Type="Scene" Version="1.2">
different objects should be placed here </imgObjectList>
<imgConnectionList>
different connections between objects should be placed here </imgConnectionList>
</imgDocument>
You can reuse this header,but pay attention to :
change the duration of the theme (here set to 20 seconds) at various places located in bold in this example
replace directory with the name of your theme series (which is also the name of the directory that contains the corresponding files)
replace file with the name of your theme to the 3 locations identified in the example.
you can also adjust the ScenePixelAspect value to set the rendering format based on your favorite project settings(1.42 corresponds to a PAL widescreen format)
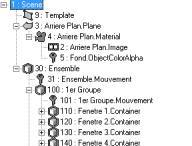
ImageExplicit Objects
We will use the ImageExplicit form designed to manage a drop zone. We will use the drop zones 1 to 5. By convention, I try to number source images objects from 2 to 8. In our exercise, I propose the ID number ="2" to ID ="6". Here is the code corresponding to drop zone 1, which handles the opening sequence: <imgObject Type="ImageExplicit" ID="2"> <imgObjectTime Ver="2" Start="0" End="20"/> <imgParameterList> <imgParm Name="Name">Drop 1.Image</imgParm> <imgParm Name="Modifiable">mtDrop|mtAudio|mtStart</imgParm> <imgParm Name="SourceType">srcExplicit</imgParm> <imgParm Name="DropZone">1</imgParm> <imgParm Name="PreHold">0</imgParm> <imgParm Name="PostHold">16.4</imgParm> </imgParameterList> </imgObject>
It will duplicate this code for each drop zones, without forgetting of course:
change the object number (ID ="xx")
change the name of the object (Drop1.image). Even if in many cases the objects may have the same name without consequence, I strongly recommande to make the effort to give a different name to each of your object, it will be a mean to save time when you will want to change your theme some time later.
amend the list of parameter values Modifiable because this drop zone is for opening (so admits the value mtStart in its list, and the drop zone 5 will be the ending sequence, and must therefore accept the value mtEnd in its list).
to change the number of the corresponding drop zone
to adjust the parameters PreHold (time elapsed since the beginning of the clip where the clip will be frozen) and PostHold (how long the clip will be frozen after been viewed. This period is therefore count from the end of the clip. Please calculate carefully these values, in case of error, it would cause a crash of Studio )
The above example set the drop zone 1, in which the clip will be active immediately ( PreHold = 0 ), and will be played for 3.6 seconds (the difference between the lifetime of the object, equal to 20 seconds, and the frozen time set to 16.4 seconds in the specified parameter PostHold ) So we do to create the 5 objects that manage the source images in drop zones. We must now relate to the theme how the objects will connect one to the others using imgConnectionList section. <imgConnectionList>
Open Studio and its theme editor, if you've done it correctly this section, you will see appearing the 5 drop zones in the user interface window. In contrast, the viewer will continue to display a black image.
Creating Wipe and Material objects
As we have seen in the description of the programming language, to display a source image, we need a Material, and then present a layout object, which will be a Wipe in our example. We want to use an object Wipe to display a frame border around the window during the transition. This will need the shSquare form of this object. Personally, I like my themes to be customizable, allowing more flexibility in their use. Here we will create for each Wipe a border with width and color adjustable using the user interface. To do so, the corresponding parameters of the Wipe object will be directly set in the Template object. It is therefore unnecessary to also set them into these Wipe. Similarly, the scale and position of each window will be changed dynamically to perform the corresponding transitions. It is also unnecessary to set them into the Wipe. So, there will be very few parameters to set in each Wipe <imgObject Type="Wipe" ID="40"> <imgObjectTime Ver="2" Start="0" End="20"/> <imgParameterList> <imgParm Name="Name">Drop 4.Wipe</imgParm> <imgParm Name="Shape" Value="shSquare"/> <imgParm Name="Progress" Value="1"/> </imgParameterList> </imgObject>
You will recognize the Shape parameter and its value shSquare, and the value 1 for parameter Progress meaning that the size of the window inside the border is 100% of the source image. This will make the border invisible outside transitions because it will be located outside the screen Just copy paste this sequence for each of the 5 Wipe, without forgetting:
to change ID numbers ="xx".
change the name of the object (which is crucial here, because we will modify certain parameters of the object from an object template).
Material will also be very simple, because the images will not be truncated, and no color effect will be applied. They will have the following form: <imgObject Type="Material" ID="41"> <imgObjectTime Ver="2" Start="0" End="20"/> <imgParameterList> <imgParm Name="Name">Drop 4.material</imgParm> <imgParm Name="Dependent">1</imgParm> <imgParm Name="MainImage">5</imgParm> </imgParameterList> </imgObject>
we need to create an Material for each Wipe , and again :
modify the object number. I strongly encourage you to adopt a numbering rule which will allow you to quickly find object in your theme. For example, in this theme, Wipe are numbered 10,20,30,40 and 50, and Material respectively 11,21,31 , 41 and 51. We see that Keyframer will be numbered 12,22,32,42, and 52.
change the name the object.
change the main image id reference to point to the appropriate drop zone (here the image ID ="5" corresponding to the drop zone 4).
Programming transitions
The transitions will be performed using objects Keyframer. These objects allow you to change all parameters. We will use them to change the window size (obtained by playing with parameters ScaleX and ScaleY ) , and its position (using parameters PositionX and PositionY ).
Remember the different numerical values of these parameters:
ScaleX, Y takes the value 1 when the window to its nominal size, ie it occupies the entire screen without particular depth setting (PositionZ) or otherwise. When the value is 0 , the window will have a null size, and therefore is invisible.
PositionX is 0 when it is centered on the center of the screen. It will be worth 0.5 to be centered on the right side of the screen, and -0.5 to be centered on the left edge of the screen.
for the first transition that will transform the drop zone from full screen to null size in the upper left corner, here is how to operate :
change settings ScaleX and ScaleY fromvalue 1 to the value 0 so that it disappears.
change the setting PositionX value 0 is the center of the screen to the value -0.5 representing the left edge of the screen.
change the setting PositionY value 0 is the center of the screen to the value 0.5 corresponding to the upper edge of the screen.
Remember that this transition takes place between times 3.2 seconds and 4 seconds ! This should match the following object:
User Interface
For this theme, I wanted to offer the choice of color and border width for the different windows, with a single control for all the windows. To achieve this, we will use a Template object Firstly, use a color selection widget. Giving the parameter name border , it will be automatically translated by Pinnacle in its equivalent Windows Setup language. As color are defined using their basic components, we will have 3 parameters corresponding to the 3 color components:
BorderRed red
BorderGreen green
BorderBlue for blue component
Note that the translation service acts only on a limited number of words. The easiest will be to put a word (always in English) and see if it is translated (if your version of Windows is not in English of course!)
Then use a slider to adjust the width of the border and offer a ranging between 0 (no border) to 0.1 which is 10% the size of the window. All these parameters are then applied to the presentation objects that manage the first 4 drop zones (it is useless to apply it to the last drop zone, since it remains full screen and its border will never appear on the screen.)
the Template object will be as follows:
Last but not least
If you don't take care, the various clips will be naturally placed from the first object declared in Section Wipe imgConnectionList , then just above, the second, and so on. Otherwise, it is also possible to specify their depth (PositionZ ), which is not useful here. As we wish to show the drop zone 1 above the 2 itself above the 3 and so on, simply declare in the imgConnectionList section the Wipe controling drop zone 5 first, then the one controlling drop zone 4, and so on until drop zone 1. Doing so, the clip will appear in the correct order.
It is the most elegant way to proceed. The other way would have been to assign a depth ( PositionZ ) different for each clip, placing the Wipe from the drop zone 1 above the one of drop zone 2, and so on.
Finally section connections will be as follows:
It's your turn to make this montage them, and to modify it if you wish. If needed, the original theme is available in Multi Fenetre serie under the name 204 - Corner . You can edit it to find the details that may lack. If difficulties persist, please contact me .
Any comment about this page ?
Written by Michael 2 messages
Changing The Duration Of The Theme
Wednesday 15 June 2011 02:22:29
Thank you for a wonderful dexcription of the 204-Corner theme
Using this theme I have been able to create several montages to suit my own movies, such as panels which slide across and/or up and down the screen or remain stationary in one location on the screen.
I do have one problem which I am not able resolve. I would appreciate if you can help.
When I create my own theme (by modification of 204-Corner) I have been unable to change the length of the theme. When I drag it to the timeline it is always 20 seconds long.
I have tried changing the '20' in the End = '20'/> statement in as many places as I have been able to find, including statements like 'OrigLeadout'>20
Written by 20cents-video 116 messages
Changing Duration
Wednesday 15 June 2011 08:12:46
Did you also modify the SceneDuration parameter in the Scene object ? (eg : < imgParm Name='SceneDuration' Value='12' / >) ?
Written by Michael 2 messages
Thanks !
Wednesday 22 June 2011 03:33:28
Thanks to a prompt response this problem has now been overcome.
Thank you 20Cents !
Only registred users are allowed to post comments
You may also find interest into following tutorials ...
seen 148202 times
built your own montage themes
seen 20490 times
Modify a montage theme
seen 18118 times
cloning a montage theme
seen 17587 times
Montage theme programming
seen 17018 times
a template file for your own themes
tutorial seen time
seen 194230 times
how to install 20cents montage themes
seen 148202 times
built your own montage themes
seen 71600 times
Pinnacle Studio 16 video edition assesment by 20cents-video
seen 57328 times
Amicalement-Votre
seen 47015 times
import an animated gif into Avid or Pinnacle Studio
Original motion backgrounds for your DVD menus and montage theme animation
Dreamscene.org propose you many free high quality screensaver. Even if these files were made to be used as PCs screen saver, their installation kit content .wmv video files that you will be able to import into Studio, either for your DVD menus, or, after some adaptations, in my montage themes ...
Thierry Philippon, who manages www.magazinevideo.com has created two training DVDs (the only existing in Europe) offering to video amateur examples and practical techniques for their families and travel movies. Entitled "The best technics of professionals for your stories and movies travel", DVDs are available in Beginner & Intermediate or Advanced level. These DVDs are made for video enthusiasts who have some basic video skills and willing to progress but also to those who use a camera or iPhone, and want to discover the video capabilities of their device. Thanks to the contribution of the moving image, the container and contents are in line here. The same situation is sometimes approached with the "bad" example in addition to "good" example. The location of the cameras or the cameraman, making of is also presented when needed.
A free module is available to give you a better idea of the content of these DVDs.