| | | |
|
|
|
|
|
|
|
|
|
|
|
|
|
|
|
|
|
|
|
|
|
|
|
|
|
|
|
|
|
|
|
|
|
|
|
|
|
|
|
|
|
|
|
|
|
|
|
|
|
|
|
|
|
|
|
|
|
|
|
|
| | | |

pages vues |
|

|
Enhance your knowledge about montage themes !
| Updated March 28, 2010 |

|
You will find here some tips and tricks to use more efficiently montage themes available on this site, but also those supplied by Pinnacle.
Known Issues
- There is a problem when using themes with Studio 14.0 . Many montage theme of this site can not be used when your project is configured for a resolution of 1920x1080. The maximum usable format seems to be 1440x1080. The problem causes a mismanagement of 3D. However, format 1920x1080 seems to work normally with Studio 12.1
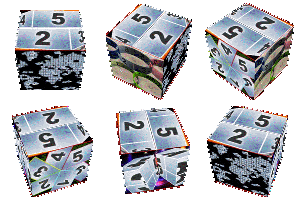
- Most Themes of this site have been designed to operate in 16:9 aspect ratio. Many of them operate normally when in 4:3, but some will however an unexpected rendering (especially series Cube and 3D)
- Some themes do not work with Studio version 12.0 (versiojn deliverd on Pinnacle's DVD). Thumbnails of these themes appear in Black, and Studio crash when trying to use them. To correct this problem, you must reload the Studio 12.1 patch available on Pinnacle website.
If you notice any other problems, please, report them to me to correct them (if possible) or I complete the above restrictions.
| | 
 
Which media can we drop in Drop Zones ? |
Drop Zones can accommodate photos or video coming directly from the montage theme interface window. Simply select the desired tab, then drag the photo or video directly into target Drop Zone.
|  | 
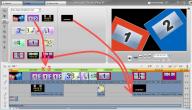
But this is not the only method to place an object in a drop zone. It is also possible to directly select a media present on the timeline, then drag it into any drop zone !
At first glance, this seems to do the same thing, but several differences should be known :
1) Put titles in a drop zone :
- firsty, using this method will you will be able to drag also Titles (note: not motion titles !) in a drop zone. This can be especially usefull to built slideshows. But you need to pay attention to background transparency for these titles, because in many cases montage theme are not designed to accommodate transparent images. This can cause unexpected effects with certain themes.
- Attention also to drop zones with a colored border, if you place a title with a transparent background, this will not remove the border so far
2) Media format adaptation :
- Then, know that most often, montage themes automaticaly adjust media to drop zone geometry. This means a 4:3 picture format will be automatically extended to fully fill the drop zone area in case of 16:9 project format. But this behavior occurs only when you drag the media into drop zone directly from the montage theme editor. When the media comes directly from the timeline, its geometry will be preserved, and a 4:3 picture in a 16:9 theme will display black strips on each side of the screen.
This property may be used to manually fit the pictures and video to be placed in the drop zones when needed.
| | 
Using video effects with montage themes | As stated in the Pinnacle's user manual, you can apply video effects to a montage theme. We must distinguish the effects applied on the theme itself, and video effect applied on clips placed in a drop zone.
1) Applying an effect on a montage theme:
To do this, you will proceed exactly as for any other media placed on the timeline. Firstly, select the montage theme, then the menu Toolbox select Add Video Effects . It is then possible to use almost all the available video effects, and they apply them on the resulting montage theme (and not on each source media used to build it).
It is also possible to use video effects controlled by keyframes on a montage theme , even if they also exploit this mechanism internally!
2) Applying an effect on a clip placed in a drop zone:
Firstly, place the clip on the timeline (by selecting the clip in the drop zone into the montage theme interface), then with a right click, select Add to Timeline .
Your clip is then on the timeline, and you can now apply one or more Video effects. Once you have finished, drag it back into its drop zone into the montage theme interface window .
Be careful when doing this, you will loose your media automatic format adaptation effect (eg 4:3 enlarged photo to fit 16:9 window), so you may need to add a Pan and Zoom effect to get a correct setting.
Once again, it will be possible to apply effects controlled by keyframes, which may be useful to animate a photo into a drop zone for example.
| | 
Changing montage theme duration
There are two main types of montage themes. Those having an opening and/or ending drop zone, and the others.
1) Montage theme without opening or ending drop zone :
In principle, montage themes which don't have opening or ending are programmed to be stretchable. So, it's possible to change their duration, with the consequence to modifiy montage theme movements speed of progress.
To do this, handle one of the sides of the amontage theme (2) (3), and stretch it in one direction or the other until getting the wanted duration. Be careful however when using a motion background, it has a duration of only 1 minute. If after streching, the theme duration exceed the motion background duration, background will then become black. If you need to exceed this period of 1 minute, it will be preferable to use a static background. Their duration are unlimited !
|  2) Montage theme with opening or ending sequence : 2) Montage theme with opening or ending sequence :
On these themes, increasing montage theme duration will have for consequence to increase the length of the opening or ending sequence, but will not change speed of embedded movements programmed into the theme.
With Studio 12.1 , the duration of movement can not be changed, while with Studio 14, it will be possible to adjust the handles of opening (5) and ending (4) movements to set movement position and duration. In principle, all my themes of this class are programmed to allow the use of these handles.
Warning: when there is an opening drop zone, extending the duration of the theme is not sufficient to correctly position the drop zone starting time. You should also manually adjust it using the small slider (1) placed in the drop zone in the montage theme editor.
Else, if you reduce the length of the theme, it will be truncated, and the animation will stop at the selected time.
| | 
Using Backgrounds provided with these themes | 
Many of my montage themes propose the use of embedded backgrounds. These are either static (dropdown box Photo ) or animated (dropdown box Movie ).
Warning: to operate these settings properly, it is necessary to download the associated files. You should download the motion backgrounds and static backgrounds.
It is not possible to mix static and motion backgrounds directly in a theme. If you choose aMotion Background (Movie) , it will appear above static background" (Photo) which will be hidden. If you want a static background, it is imperative to select null in the dropdown box Movie .
In general, it is also possible to customize these backgrounds, adding a color directly from the theme editor interface !
If you wish to apply a personal background, it is obviously possible. You should proceed as follows:
- Clear static background by selecting Null in the dropdown box Photo .
- Clear animated background by selecting Null in the dropdown box Movie .
- Move your theme on the second video track of the timeline.
- Then, put your personal background in the main track.
You can also create backgrounds using my Background series of themes. It allows you to create aditionnal backgrounds blending different static or motion backgrounds. For this you need to proceed as explained for a personal background, and put this background montage theme on the first track.
| | 
Using multi-track themes | 
You'll find some series (eg Video Wall) , themes composed of several sub-themes to be placed on each one of one video tracks of the timeline. When these themes are "triple track", they will use the titles track as a 3rd track.
Note that those multi-track montage themes (especially for triple tracks) require a huge processing power (on my modest Dual Core 2.4 GHz configuration ...). To avoid a too painful work, I suggest you do so :
- Firstly, put the 3 sub-themes each beside the other on the main track of the timeline,
- Select montage theme one by one and drop sequences in the various drop zones.
- Adjust settings for each theme (border color, etc.... ).
- Once all settings are ok, move each sub-theme on its track.
| | 
Where are located the backgrounds |
For information, the different backgrounds are placed in following directories:
1) Motion Backgrounds :
Under Vista and Seven C:\Users\Public\Documents\Pinnacle\Content\Motion Backgrounds 16x9
Under XP C:\Documents and Settings\All Users\Documents\Pinnacle\Content\Motion Backgrounds 16x9
2) static Backgrounds :
Under Vista and Seven C:\Users\Public\Documents\Pinnacle\Content\16x9 Backgrounds
Under XP C:\Documents and Settings\All Users\Documents\Pinnacle\Content\16x9 Backgrounds
Their file names always start by 20cents. You can always replace these files with others, since they are of same type, they will be placed in the same directory and will have the same name as current files. They will then be selected instead of my original files.
For motion backgrounds, however I advise you to format them so they last at least a minute !
| | |

|
You may also find interest into following tutorials ... | 
seen 57369 times | Amicalement-Votre |
| 
seen 30246 times | Create your Karaoke |
| 
seen 24482 times | travel itinerary |
| 
seen 19637 times | using Papy Serge's Album |
| 
seen 15835 times | Realize CSI Miami generic with Avid or Pinnacle Studio |
|
|
|
|
|
tutorial seen  time time |
|
|
Web site of the month !
Original motion backgrounds for your DVD menus and montage theme animation
Dreamscene.org propose you many free high quality screensaver. Even if these files were made to be used as PCs screen saver, their installation kit content .wmv video files that you will be able to import into Studio, either for your DVD menus, or, after some adaptations, in my montage themes ...
Go ahead, you will enjoy, and it's very nice !.
|
Perfect your shooting technique
Thierry Philippon, who manages www.magazinevideo.com has created two training DVDs (the only existing in Europe) offering to video amateur examples and practical techniques for their families and travel movies. Entitled "The best technics of professionals for your stories and movies travel", DVDs are available in Beginner & Intermediate or Advanced level. These DVDs are made for video enthusiasts who have some basic video skills and willing to progress but also to those who use a camera or iPhone, and want to discover the video capabilities of their device. Thanks to the contribution of the moving image, the container and contents are in line here. The same situation is sometimes approached with the "bad" example in addition to "good" example. The location of the cameras or the cameraman, making of is also presented when needed.
A free module is available to give you a better idea of the content of these DVDs.
|
|
|
|
|
|
